|
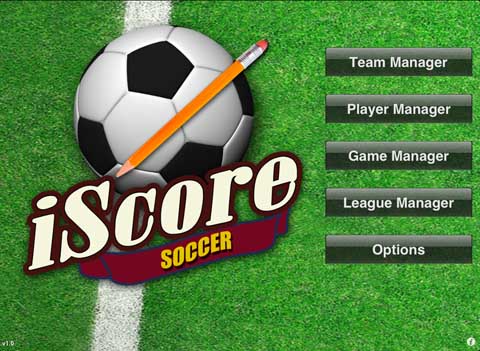
Welcome to the iScore Soccer tutorial
|
|
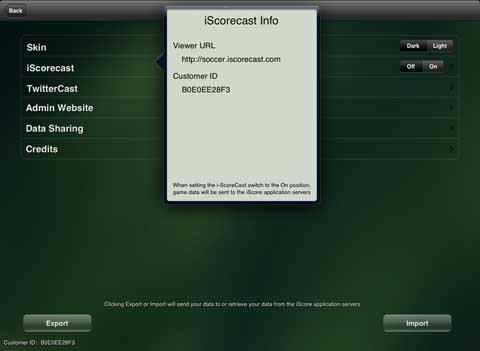
Press the Options button in the iScore main menu to see the iScore Options screen. Change the color of the interface between dark
and light by tapping on the Dark/Light selector. Tap i-ScoreCast to see the information the viewers will need to view your scorecasts.
You can then turn i-Scorecast on and off using the Off/On selector. Set up your Twitter information so that you can tweet updates from the main
scoring screen during a game. Tapping the Admin Website item will give you the information you need to log into your Admin Website.
Data Sharing allows you to transfer data between devices.
The Export button at the bottom can be used to backup your data to the iScore servers to prevent data loss in case of
catastrophic failure of your device. We recommend exporting your data after every game.
|
|
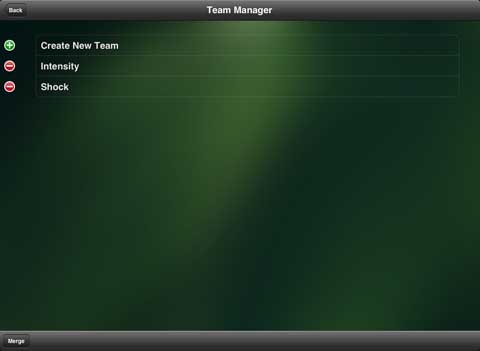
From the iScore main menu screen press 'Team Manager' to add, edit or delete teams. Although you can create teams on the fly
at game creation time, it is sometimes easier to set your teams up beforehand in Team Manager. Press 'Create New Team' to create a new team.
|
|
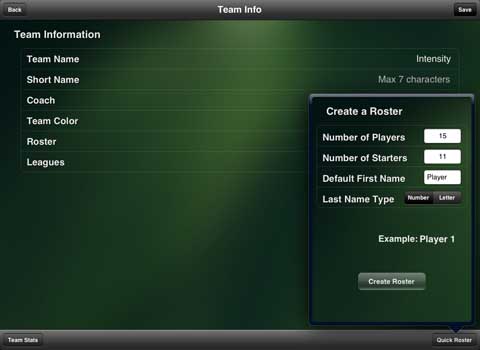
The Team Info screen is the place to enter and edit information about a team. Start by entering the Team Name, Team Short Name and Team Color.
Although, the Team Short Name and Team Color are optional, they can often be a helpful cue when scoring a game and they
can make the scorecasts more visually appealing to the viewers.
In the bottom left is the Team Stats button. Touch this button after scoring several games to view and email your cumulative season stats.
In the bottom right you will find the Quick Roster button. This can be used to quickly generate an opposing team with default player names
and numbers.
Touch the Roster item to view the team's roster
|
|
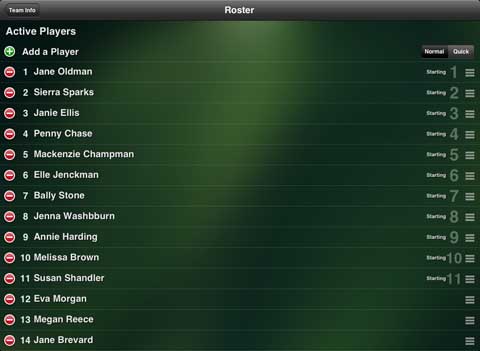
The Roster screen keeps a list of all players on a team.
Press the red circle to the left of a player's name to remove the player from the roster. Removing a player from the roster does
not delete the player from the system. The player can still be accessed in Player Manager and will still be available for adding
to another team.
The order of the players can be changed by dragging up and down on the icon
that looks like three horizontal bars to the far right of a player's name.
Press 'Add a Player' to add a player to the team's roster.
|
|
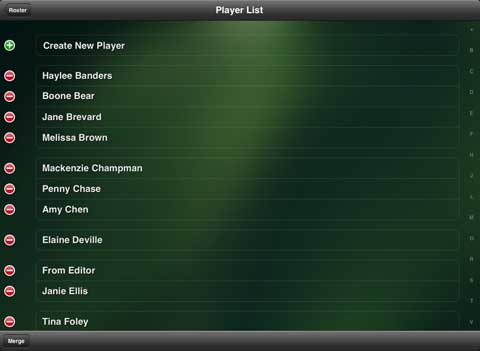
After pressing 'Add a Player' you will be taken to the Player List screen. If the player you wish to add already exists in iScore,
select that player from the list. If the player does not already exist, press 'Create New Player'
|
|
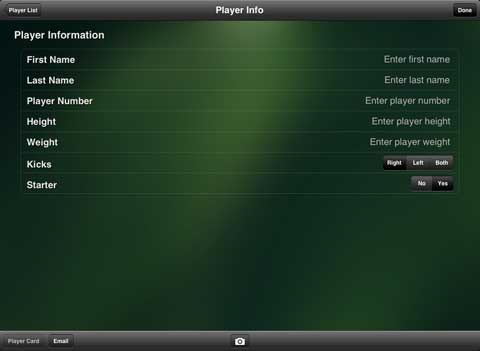
Pressing 'Create New Player' in the Player List screen or selecting a player from the Roster screen will take you to the Player Info screen.
Here you can enter the name, number, height and weight.
|
|
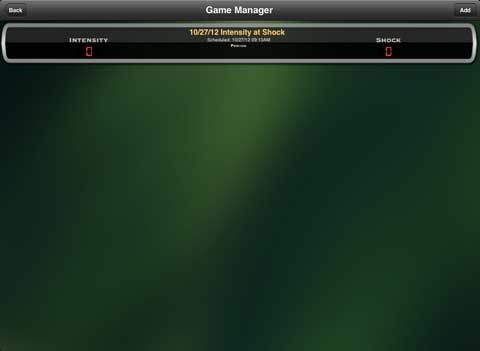
Once you have created and populated the teams it is time to create a game. From the iScore main menu press the 'Game Manager'
button to get to the Game
Manager screen. To create a new game press the 'Add' button in the upper right.
|
|
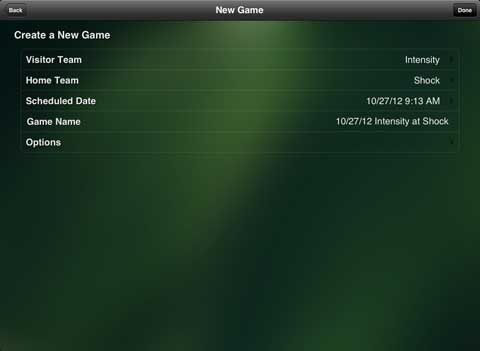
Select the visitor team and the home team by tapping on the 'Visitor Team' or 'Home Team' item. In the Team List that appears you can either
select an existing team
or create a new team. You may also select the game options such as number of periods and length of period by tapping the 'Options' item.
Touch Done in the upper right to create the game
|
|
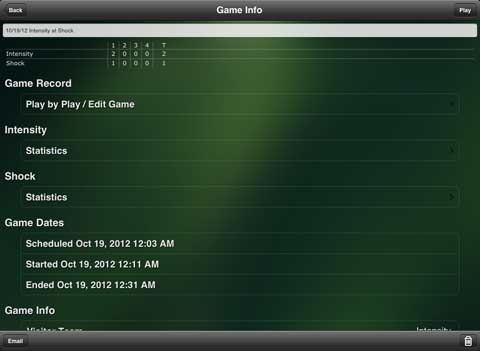
After the game is created you will be returned to the Game Manager screen.
Tap on the newly created game to go to the Game Info screen. At the top of the Game Info screen
is the name of the game. The game name can be editted by tapping the text area. Press Done in the keyboard to save the name of the game.
The Play by Play item will show the play by play listing of the game after the game is complete. The stats for home and visitor
will also be populated after game data has been entered. Game Dates can be editted by tapping. Scroll to the bottom of the page to see the i-Scorecast Synchronize item.
Normally this item will not need to be used but you may need to tap it if you switch scorecasting on after a game has already started or if
you did not have a good network connection for part of the game.
At the bottom you will find a button to send emails of your stats to any email address and a trashcan button if you wish to delete a game.
To begin scoring a game press Play in the upper right.
|
|
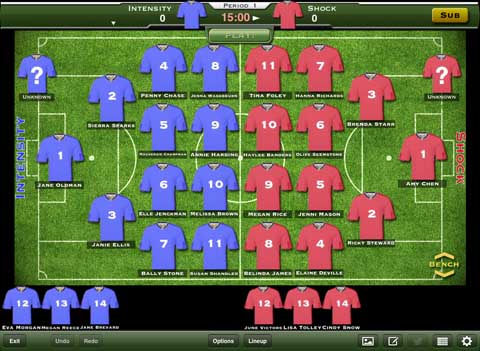
The scorekeeping screen has everything you need to track a game. The players initially appearing on the field
come from the players marked as Starting in the Lineup. Press the Lineup button in the bottom menu bar to see the Starting Lineup screen
(iPhone only) Press the Menu icon in the lower left of the scorekeeping screen to show or hide the bottom menu bar.
|
|
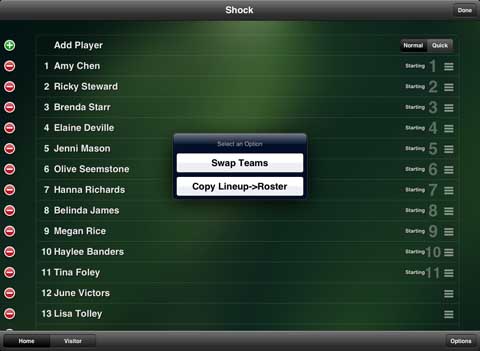
The Lineup screen will initally be populated with the players who were in the roster for the selected teams at the time the game was created.
You can add or delete players from the Lineup for the game at any time. The steps are similar to those used to add and delete players
from the Roster.
Switch between Home and Visitor teams using the switch in the bottom left. Press the Options button in the lower right
to swap home and visitor teams before the game has started or copy the players in the lineup back to the roster if the lineup has
new players that you wish to include in the roster.
|
|
|
When the scorekeeping screen first appears, both the players on the field and the players on the bench are visible. You can show or hide
the players on the bench at any time by pressing the Bench icon in the lower right. Hiding the bench can make play entry
easier if you keep track of the ball paths of the plays.
You can drag players from the bench to the field, the field
to the bench or between any field positions. You can even drag multiple players at the same time using multiple fingers.
|
|
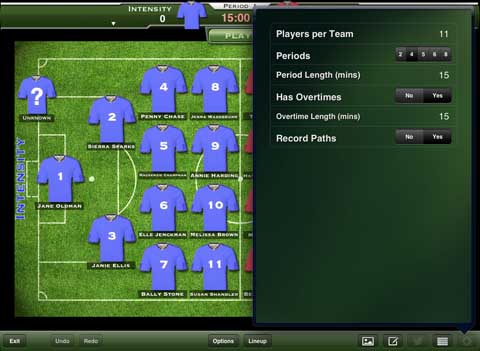
Press the Settings button in the lower right to access the game settings. Here you can set the game length, the overtime configuration
and whether or not you wish to record the path of the ball for each play or the position of the event for plays such as offsides.
|
|
When the game begins, press the flashing Play! button under the clock.
The bench will hide (although it can be accessed by touching the Bench icon at any time) and you can now begin recording
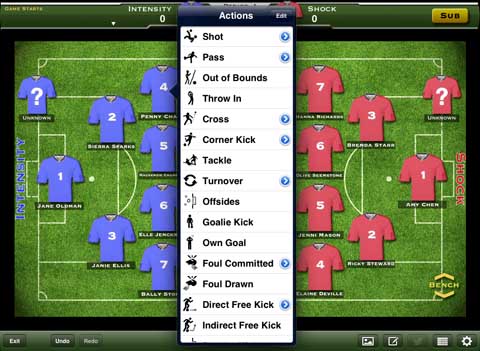
the events of the game. Tap on any player who had a recordable event. Notice that there is an Unknown player on the screen for each team. If you see an action you wish to record but don't know
who the player is at that moment, tap the Unknown player for the team and assign the action to the Unknown player.
The player can easily be switched later if you find out who the player was.
After taping a player, a list of actions will appear. By default, some of the most common actions
appear at the top of the list and the less common actions appear toward the bottom but these actions can be configured any way
you like by pressing the Edit button in the upper right of the Actions popover.
|

|
After pressing the Edit button you will see the drag icons appear to the right of the items in the action list. Press and hold on
the drag icon (it looks like three horizontal bars) until the row "lifts up". You can then drag that item to any position in the list.
When you are finished setting the actions in the order you wish to use, press Done in the upper right of the Actions popover.
|
|
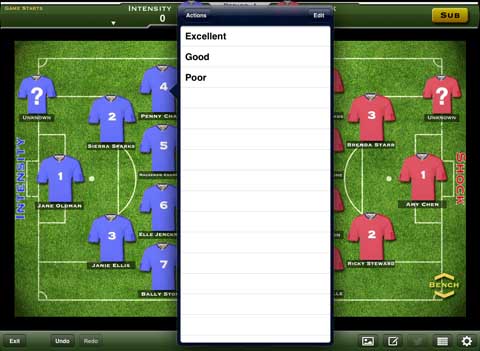
Some of the action types have additional modifiers. These actions are indicated with the blue arrow icon to the right of the action.
For example, if you press the blue icon next to Pass you will see the modifiers Excellent, Good and Poor. Tap on one of these choices
to indicate that the pass was either Excellent, Good or Poor. If you choose to not use the modifiers and instead simply tap on the
Pass row then the Pass will automatically be recorded as Good.
For throw ins where the foot was lifted you can tap the blue modifier icon next to Turnover to see the "Throw in Lifted Foot" selection.
|
|
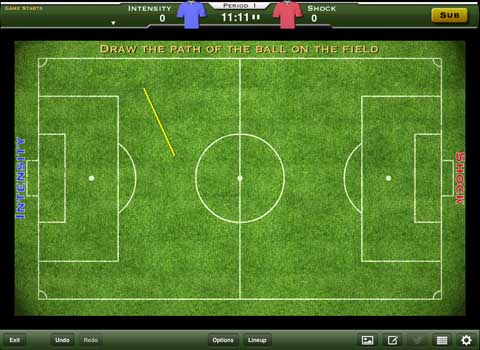
If you have "Record Paths" set to Yes in the Game Settings screen, after selecting an action you will then be asked to draw the path of the
ball on the screen. Touch down on the location where the ball started and without lifting your finger, drag to the location where the ball went.
The yellow line will update to show the path as you drag. When you have the path correctly drawn, lift your finger and the ball path will be saved.
|
|
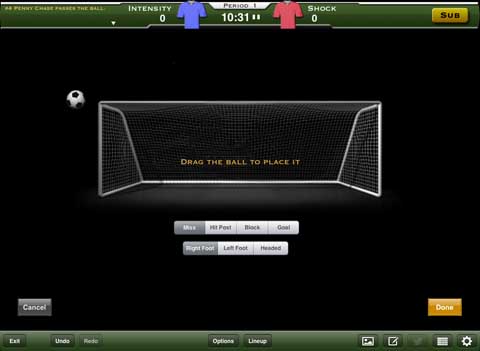
The Shot action allows you to provide additional information about the shot such as whether the goal was missed, made or blocked.
You can also set whether the ball was shot left footed, right footed or headed.
By default the shot is marked as missed. Drag the ball around with your finger to show the location of the ball with respect to the net.
You can change the shot result to either Miss, Hit Post, Block or Goal. Hit Post is similar to Miss except the it is a shot that did
not score but hit the post.
|
|
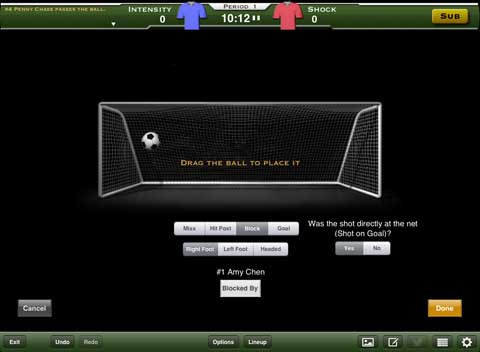
Select Block if the shot was stopped by the keeper or other defensive player. By default, if you have a keeper assigned on the scoring screen,
the keeper will be set as the "Blocked By". Press the "Blocked By" button to choose a different player if necessary. Statistically, the
play will be recorded as a save or a block based on the "Shot on Goal" setting. If "Shot on Goal" is set to Yes, the play will be recorded
as a save for statistics purposes. If "Shot on Goal" is set to No, the play will be recorded as a block.
|
|
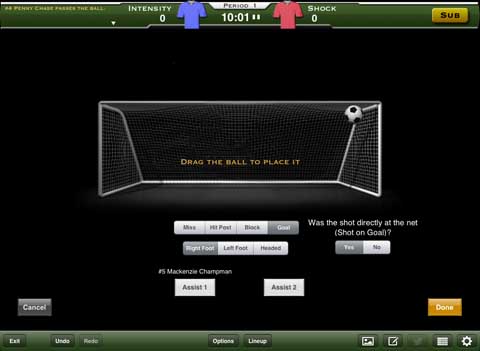
Select Goal if a goal was made. You can select up to two players for an assist by tapping on the Assist 1 or Assist 2 buttons. Drag
the ball to where the shot entered the goal.
|
|
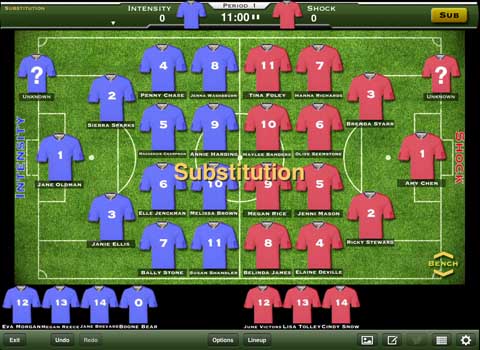
Substitutions are very easy to record. When a substitution occurs press the Sub button in the upper right. Any changes
you then make to the players on the field will be assigned to the previous substitution event. This means that if you can't see who was substituted
at the moment the substitution occurred it's not a problem. Simply put the new player on the field when you know who was substituted and the
substitution and the player's playing time will be calculated from the point where the Sub button was pressed. A new substitution can be indicated
with a new press of the Sub button.
|
|
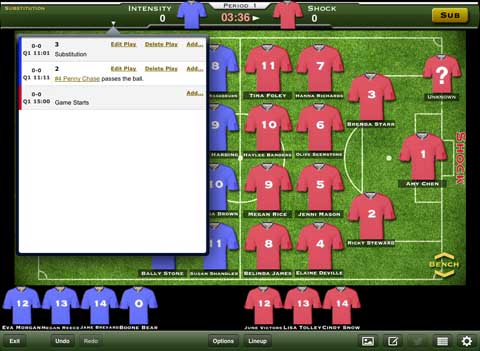
To make edits during the game, tap in the upper left area of the scoring screen (on the iPhone tap the Edit button in the upper right)
You can easily change any player by tapping on a player name and then selecting a new player. You can also use the Edit, Delete and Add links
to make more extensive corrections to the plays.
|
|
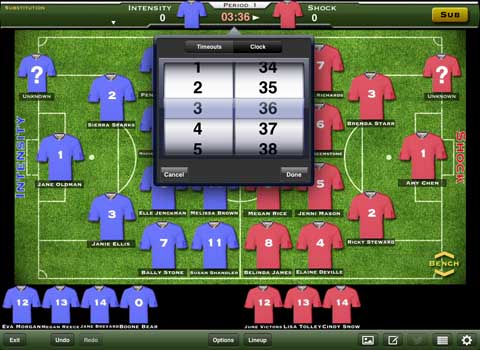
The clock can be paused at any time by tapping on the clock in the scoring screen. The clock will then turn red to indicate that it is pause
and the clock adjustment screen will appear. You can also set timeouts by switching the Timeouts/Clock switch to Timeouts
When the clock is red, tapping it again will unpause the clock.
At the bottom right of the scoring screen you will find buttons that will allow you to take notes, tweet the current state of the game (if Twittercast is turned on),
view full game stats and set game options.
Always remember that you can record as much or as little of the action as you want. Plays are very easy to edit so if you miss some of the action during
a complex play, you can always return to add additional information later. If the other team's stats aren't important to you then you may not even need to enter players into the opposing team's Lineup.
If you have any additional questions after viewing this tutorial please email us at support@iscoresports.com
|